Answers
From Family Tree Maker (Windows) to Reunion (Mac)
Many Reunion users are former Family Tree Maker users who switched to Reunion successfully using a GEDCOM file to transfer their data.
The instructions below are for exporting a GEDCOM file from Family Tree Maker and importing the GEDCOM file into Reunion 9. We suggest you bookmark this page and refer to it while transferring your data.
Step 1: Open your family file in Family Tree Maker.
Step 2: From the main menu, choose
Step 3: From the popup menu, choose .

Step 4: To save the GEDCOM file to your Windows Desktop, click on the left side of the window.

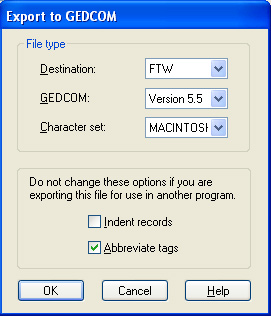
Step 5: Click and a new window will open. Make sure the settings in the Export to GEDCOM window are as follows:

Step 6: Click .
The GEDCOM file will appear on your Windows Desktop. (Note that the .GED extension may not be visible when the file is on the Desktop.)
Step 7: Move this file to your Macintosh via USB flash drive, CD-R, network, or email.
Step 8: On your Macintosh, drag and drop the GEDCOM file onto the Reunion 9 icon which is inside your Applications folder.
Notes...
- Reunion 9 in "demo mode" does not import GEDCOM files.
- GEDCOM exchange with Family Tree Maker is generally very good, depending on the extent to which custom fields and source records are utilized. However, the basics, such as all the people, names, dates, places, links (parents to children, spouses, etc.) should transfer fine. The most problematic area of GEDCOM is with source records.


